Manage ownership in Port
Ownership in Port defines who is responsible for specific entities in your internal developer portal — such as services, repositories, or incidents.
Managing ownership correctly ensures clear accountability, smoother collaboration, and accurate reporting.
Ownership in Port is represented through relationships between users, teams, and catalog entities.
This page outlines how to manage ownership in Port, from syncing users and teams to assigning them to catalog entities, and visualizing the data.
How does it work?
When creating a Port account, some default blueprints are created for you. Two of them are the User and Team blueprints, which are used to represent your users and teams.
Using these blueprints, we can define ownership of resources in the software catalog to specific users or teams.
Defining ownership in Port is composed of several steps:
-
Sync Users - the first step in managing ownership is syncing your users from 3rd party tools into Port, and connecting to the relevant Port user. This allows you to have a single component in your portal that represents your user across your entire ecosystem.
-
Sync Teams - just like users, teams from 3rd party tools can be synced into Port, and connected to the relevant Port teams.
-
Assign Users to Teams - once Port users and teams are synced and connected to each other, users can get visibility into the resources owned by their team/s.
-
Assign Teams to Catalog Entities - define ownership of resources in your catalog to Port teams.
For example, a GitHub repository can be owned by thefrontendteam. -
Assign Users to Catalog Entities - define ownership of resources in your catalog to Port users.
For example, a PagerDuty incident can be owned by the currenton-calluser.
Sync users
Users can be synced into Port either manually or automatically, depending on your integrations.
Note that when using an SSO provider, users and teams are synced automatically.
Automatically
-
Built-in integrations: Update the integration mapping to connect the Port user to the integration user:
- GitHub
- GitLab
- Azure DevOps
- Jira
- kind: user
  selector:
    query: 'true'
  port:
    entity:
      mappings:
        identifier: .login
        title: .login
        blueprint: '"_user"'
        relations:
          git_hub_user: .login
- kind: group-with-members
selector:
query: 'true'
includeBotMembers: 'true'
includeInheritedMembers: 'true'
port:
itemsToParse: .__members
entity:
mappings:
identifier: .item.username
title: .item.name
blueprint: '"_user"'
relations:
gitlab_user: .item.username- kind: user
selector:
query: 'true'
port:
entity:
mappings:
identifier: '.id'
title: '.user.displayName'
blueprint: '"_user"'
relations:
azure_devops_user: '.id'- kind: user
selector:
query: 'true'
port:
entity:
mappings:
identifier: .accountId
title: .displayName
blueprint: '"_user"'
relations:
jira_user: .accountId -
Custom integrations: We can create a simple automation to link new Port users to the matching integration user upon creation:
Manually
-
Self-service Action (SSA) – Register your user An out-of-the-box self service action used to register the logged-in user in Port, connecting it to the relevant 3rd party user/s.
-
Register a new user
This can be done from the Users catalog page:
Click on the+ Userbutton, then click onRegister existing user.This is useful for inviting a new user and defining their relations to 3rd party users in a single step.
-
Edit an existing user entity
This can also be done from the Users catalog page:
Click on the...button, then click onEdit.Ideal when updating a user with new data — for example, connecting it to a Slack user.
Custom integrations:
3rd party tools for which Port does not have a built-in integration can be synced manually using the following guides:
Sync teams
Teams can also be synced into Port either manually or automatically, depending on your integrations and conventions.
Note that when using an SSO provider, teams are synced automatically.
Automatically
-
Built-in integrations:
Using the integration mapping, we can define how to create/update teams in Port.
For example, the following mapping can be used to create/update teams in Port using GitHub:
- kind: team
selector:
  query: 'true'
port:
  entity:
  mappings:
    identifier: .id | tostring
    title: .name
    blueprint: '"_team"'
    relations:
      git_hub_team: .id | tostring
In this example, if the team already exists in Port, it will be connected to the GitHub team with the same identifier.
If it does not exist, it will be created and connected to the GitHub team with the same identifier.
Manually
-
Register a new team
This can be done from the Teams catalog page:
Click on the+ Teambutton.This is useful for creating a new team and defining its relations to 3rd party teams in a single step.
-
Edit an existing team entity
This can also be done from the Teams catalog page:
Click on the...button, then click onEdit.Ideal when updating a team with new data — for example, connecting it to a Sentry team.
Assign users to teams
In many cases, ownership is assigned to a team and not a specific user. By default, Port allows you to assign one or more owning teams to each entity in your catalog.
As a user, it's important to see all of the resources owned by you or your team/s. Therefore, the next step is to ensure that all Port users are assigned to the relevant team/s.
Automatically
-
When using SSO, users and teams are created and connected automatically.
-
When using Entra ID, you can use this integration tool to sync users and teams into Port.
-
When using Gitlab or ADO integrations, you can connect Port team to Port user when fetching the integration's teams.
For example, the following mapping connects a team in Port to a user in Port based on the GitLab association (assuming the GitLab group is already mapped to the Port team):
- kind: group-with-members
  selector:
    query: 'true'
    includeBotMembers: 'true'
    includeInheritedMembers: 'true'
  port:
    itemsToParse: .__members
    entity:
      mappings:
        identifier: .item.email
        title: .item.name
        team: .full_path
        blueprint: '"_user"'
Manually
-
Self-service action (SSA) – Add team members
An out-of-the-box self service action used to add users to an existing team. -
Edit a user entity
This can be done from the Users catalog page:
Click on the...button, then click onEdit. -
When creating/inviting a new user from the UI, you can assign them to teams as part of the creation process.
Assign teams to catalog entities
Automatically
-
If using GitHub, you can use the team-mapper script to map repositories to teams based on commit history.
-
If an entity has an property or relation that contains the integration team identifier (e.g., GitHub repository →
github-teams), update the mapping so that thegithub-teamsvalue will automatically be set inowning teams.- kind: repository
selector:
query: 'true'
teams: true
port:
entity:
mappings:
identifier: .full_name
title: .name
blueprint: '"githubRepository"'
properties:
readme: file://README.md
url: .html_url
defaultBranch: .default_branch
$team: '[.teams[].id | tostring]'
relations:
githubTeams: '[.teams[].id | tostring]'Note that this assumes Port team identifiers match GitHub team identifiers.
Manually
-
Self-service action (SSA) – Own services
An out-of-the-box self service action used to assign ownership of one or more services to a specific team. -
Edit an entity
This can be done from the entity's relevant catalog page:
Click on the...button, then click onEdit, and change theOwning teamsfield. -
When creating a new entity, assign its owning team(s) as part of the creation process.
Assign users to catalog entities
In some cases, ownership needs to be assigned to a specific user and not a team. For example, a PagerDuty incident may be owned by the current on-call user, or a GitHub Pull Request may be owned by the creator.
Automatically
In many Port integrations, blueprints can have out-of-the-box relations to the 3rd party user blueprint, with a default mapping configuration that automatically sets the value of this relation.
Additionally, some blueprints have out-of-the-box relations to the Port user blueprint, with a default mapping configuration that automatically sets the value of this relation as well.
Here are some common examples:
-
The
GitHub Pull Requestblueprint has a default relation ("git_hub_creator") to the GitHub user that created the PR.
Additionally, it has a default relation ("creator") to the Port user associated with the GitHub user that created the PR. -
The
Jira Issueblueprint has a default relation ("reporter") to the Port user that reported the issue. -
The
PagerDuty Incidentblueprint has a default relation ("assignee") to the Port user that is assigned to the incident.
Manually
- Edit an entity
If a blueprint has a relation to the Port user blueprint, you can edit the entity from its catalog page and change the value of this relation:
Click on the...button, then click onEdit, and change the relation value.
Visualize user & team data
Now that we have set up ownership in our catalog, let's see how we can visualize it in useful ways.
Default pages & filters
-
By default, the following pages are available in your catalog:
-
User entity page: View all Port users and their related 3rd-party users and the Port teams they belong to.
-
Team entity page: View all Port teams and their related 3rd-party teams.
-
-
In any table or chart, you can use the
My TeamsorMyfilters to show only entities that belong to your teams or are owned by you.
User management dashboard
Now let's create a dedicated dashboard to manage users and ownership of entities in your catalog.
This dashboard will allow you to:
- View which users are assigned to which team/s.
- View which users from 3rd-party tools are connected to which Port user/s.
- View which teams from 3rd-party tools are connected to which Port team/s.
- View which services are owned by which team/s.
- Execute several self-service actions to onboard users to teams, register new users, and assign ownership of services to teams.
Create a dashboard
-
Navigate to the Catalog page of your portal.
-
Click on the
+ Newbutton in the left sidebar. -
Select New dashboard.
-
Name the dashboard Ownership Management.
-
Input
Manage and onboard your users and teamsunder Description. -
Select the
Usersicon. -
Click
Create.
We now have a blank dashboard where we can start adding widgets to visualize ownership insights.
Add widgets
In the new dashboard, create the following widgets:
Users assignment (click to expand)
-
Click
+ Widgetand select Table. -
Title:
Users assignment. -
Choose User as the Blueprint.
-
Click
Save. -
Click on the
...button in the top right corner of the table and select Customize table. -
Define the visible columns to include the user title, team, and third parties associated user.
-
Click on the save icon in the top right corner of the widget to save the customized table.
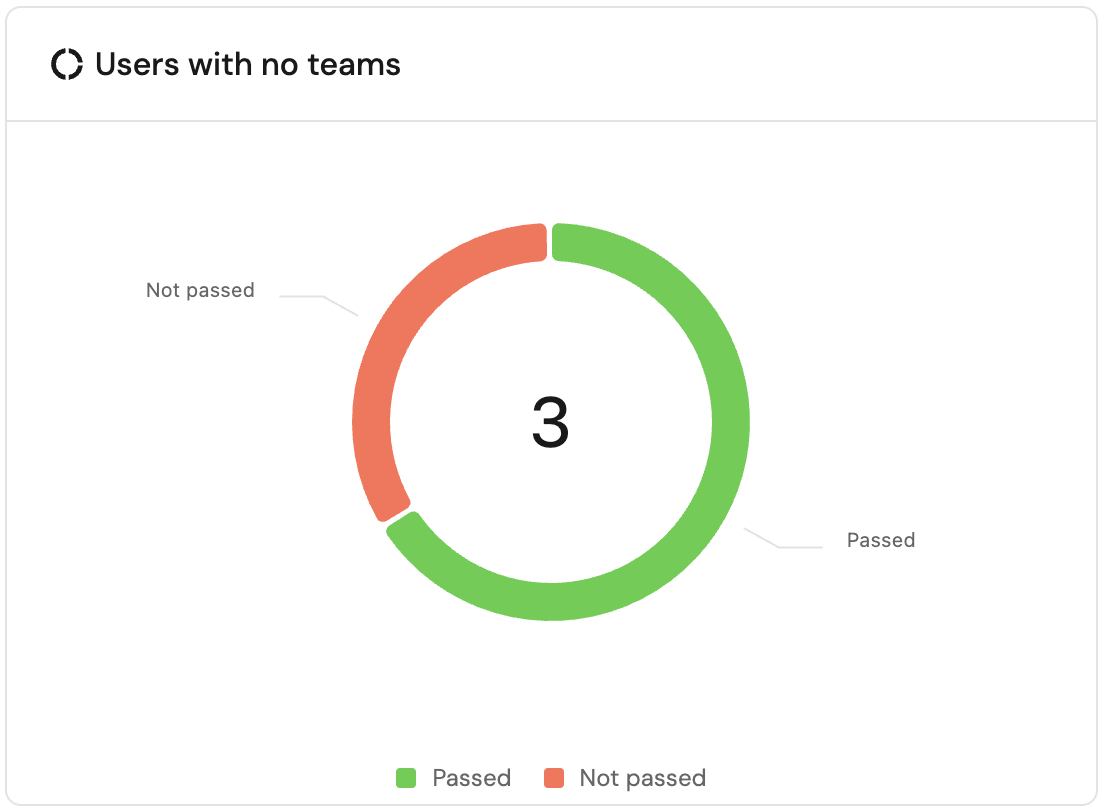
Users with no teams (click to expand)
-
Click
+ Widgetand select Pie chart. -
Title:
Users with no teams. -
Choose the User blueprint.
-
Under
Breakdown by property, select the Ownership - Has Team property -
Click Save.
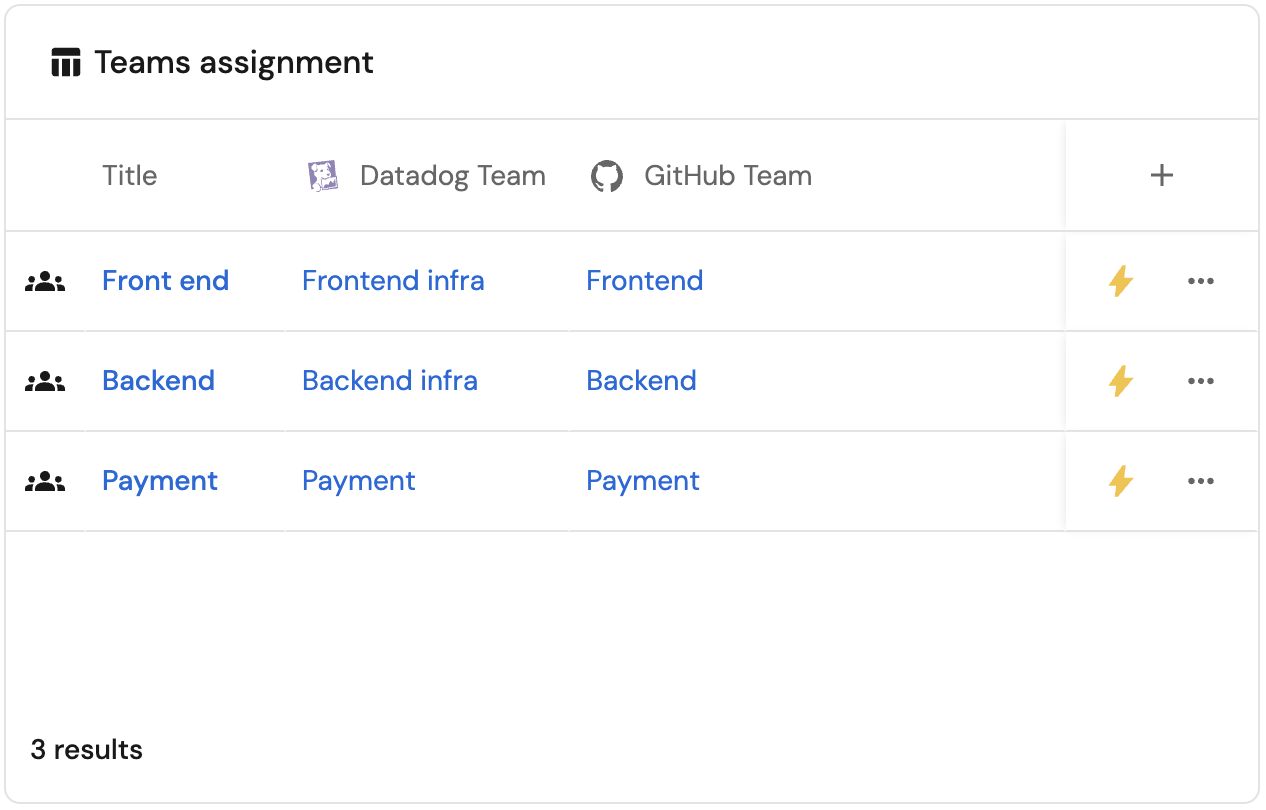
Teams assignment (click to expand)
-
Click
+ Widgetand select Table. -
Title:
Teams assignment. -
Choose the Team blueprint.
-
Click Save.
-
Click on the
...button in the top right corner of the table and select Customize table. -
Define the visible columns to include the team's title, and third parties associated teams.
-
Click on the save icon in the top right corner of the widget to save the customized table.
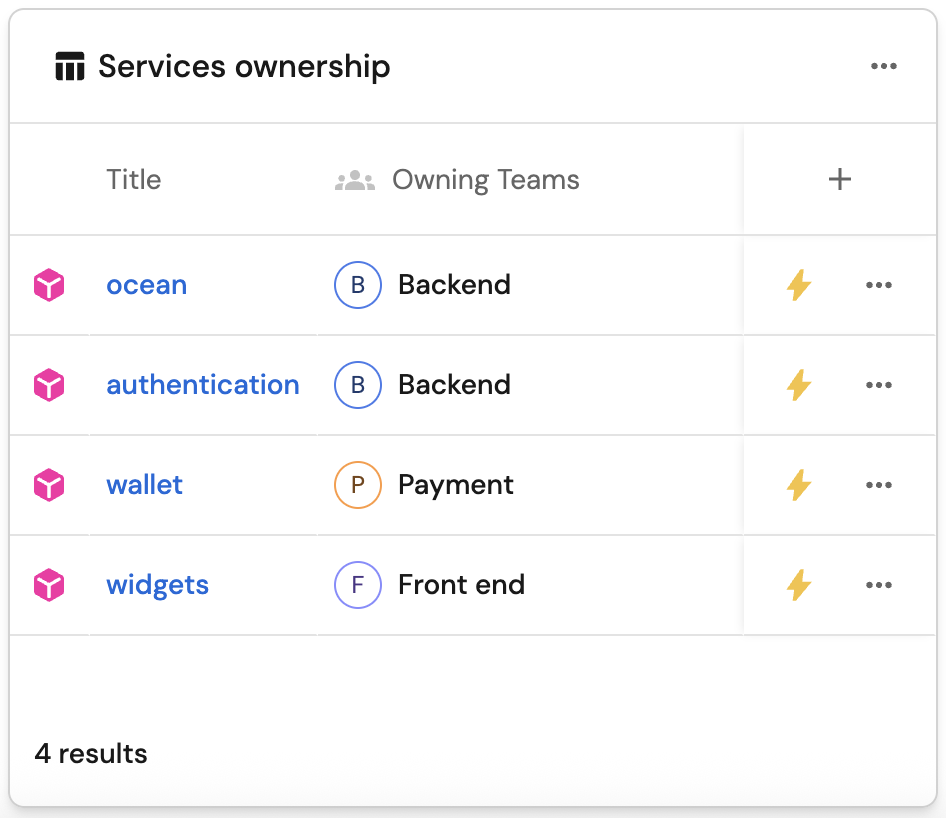
Services ownership (click to expand)
-
Click
+ Widgetand select Table. -
Title the widget Services ownership.
-
Choose the Service blueprint
-
Click Save to add the widget to the dashboard.
-
Click on the
...button in the top right corner of the table and select Customize table. -
Define the visible columns to include the service title and the owning teams.
-
Click on the save icon in the top right corner of the widget to save the customized table.
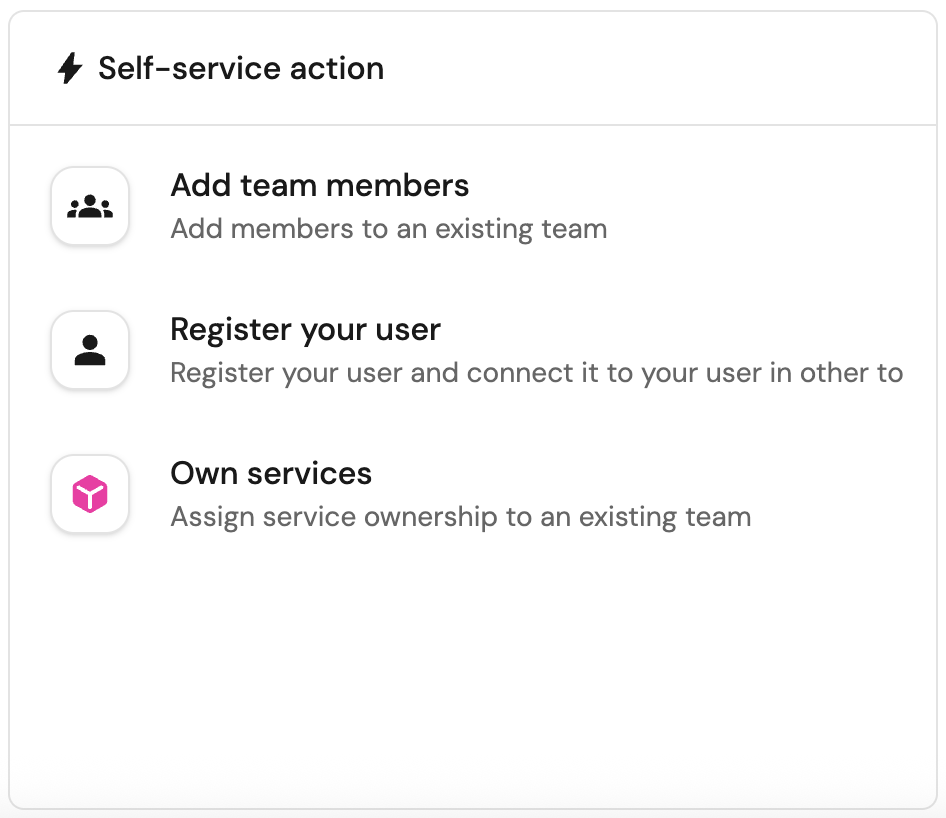
Ownership management actions (click to expand)
-
Click
+ Widgetand select Action Card. -
Under
Actions, select all the Ownership management actions we created:- Add team members
- Register your user
- Own services
-
Title:
Ownership management. -
Click Save.